
How to install double scaffold beams or Piggyback beams
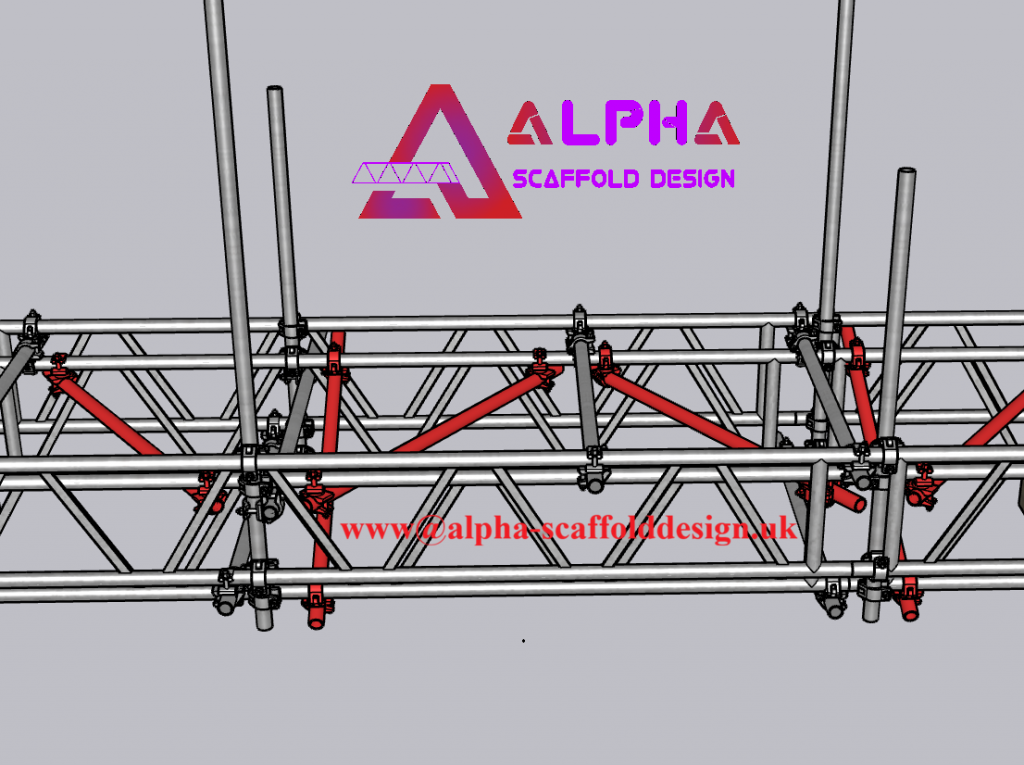
Double beams (Piggyback beams) — installation tips + 3D model
Double (piggyback) scaffold beams are commonly used on bridged arrangements to increase capacity and stiffness.
This quick guide highlights the key installation checks for double scaffold beams / piggyback beams and links to an interactive 3D model viewer so you can rotate, zoom and inspect the lacing, bracing and node points in detail.
Key installation checks for double / piggyback beams
1) Restrain the compression chord (top chord in bridged cases)
As a rule, always restrain the chord in compression. For typical bridged beam arrangements this is the top chord, and it should be restrained at 1.0 m centres (or as per the design).
2) Common mistake: mixed restraint spacing between the two beams
A frequent site error is restraining only one beam at 1.0 m centres, while the second beam ends up effectively restrained at 2.0 m centres. This defeats the purpose of the piggyback arrangement and can reduce stability of the compression chord.
3) Lacing position matters (so both beams are restrained)
After installing the first set of beams, check the lacing position carefully:
- Place the top laces on the top chord so the piggyback (second) beam is received correctly and both beams are restrained at 1.0 m centres.
- If the lace is placed underneath, the second beam may not be restrained as intended.
4) Bottom lace clearance (avoid clashes)
Check the bottom lace position. If it is installed like a check tube, it can clash with the beam and prevent correct seating or create buildability issues.
5) Form proper node points (puncheons, section braces, plan bracing)
Install laces and section braces as close as practical to the puncheons to form proper node points. Do the same with plan bracing—connect it close to node points for effective load transfer and restraintnign.

Scan the QR code to view the 3D model
Click the button for 3D view:
Use the 3D model to inspect:
– restraint spacing intent (1.0 m centres)
– top lace placement and beam seating
– bracing alignment and node points
Need a professional design?
For enquires: Info@alpha-scaffolddesign.uk
Below you can watch a quick YouTube reel
FAQ – Double (Piggyback) Scaffold Beams
What are double scaffold beams (piggyback beams)?
Double scaffold beams (often called piggyback beams) are two beams used together to increase capacity and stiffness on bridged arrangements, where stability and restraint detailing are critical.
Why does the compression chord need restraint?
Because the chord in compression is prone to instability if it’s not laterally restrained. In bridged cases this is commonly the top chord, which should be restrained at the spacing shown on the design (often 1.0 m centres in typical arrangements).
What’s the most common installation mistake with piggyback beams?
Restraining only one beam at 1.0 m centres while the second beam ends up effectively restrained at 2.0 m centres. This reduces the intended stability/benefit of the piggyback arrangement.
Where should the top laces be placed for double beams?
Top laces should be positioned on the top chord so the second beam is correctly received and both beams are restrained as intended (for example at 1.0 m centres). Placing the lace underneath can leave the second beam unrestrained.
Why do I need to check bottom lace clearance?
If the bottom lace is installed like a check tube it can clash with the beam, affecting seating and buildability.
What are “node points” and why do they matter?
Node points are the effective connection locations where braces and laces meet the verticals (puncheons). Installing laces/section braces and plan bracing close to the puncheons helps form proper node points and improves load transfer/restraint behaviour.
Is this guide a substitute for a scaffold design?
No. This is a training/illustration example. Final arrangements must follow the project design brief, temporary works controls and the issued scaffold design.
Where can I view the 3D model?
Use the “View model in 3D” link (or the QR code on the page) to open the interactive model in the Trimble