
Cantilever Loading Bay Design & Installation Guide
Step-by-Step Guide: How to Install a Cantilever Scaffold Loading Bay.
Technical Author

Prepared by Mihai Rebenciuc, MSc Eng
Director & Lead Scaffold Design Engineer
Alpha Scaffold Design Ltd
- MSc Civil Engineering
- Over 20 years’ scaffolding and engineering experience
- More than 2,000 scaffold designs completed
- Specialist in complex scaffold engineering
- Design required: Yes
- TG20 compliant: No; site specific calculations required.
- Risk: High; when not installed to a design.
While this guide covers the key aspects of the installation method, remember that all high-load structures must be built to an engineered specification. Alpha Scaffold Design provides expert scaffold cantilever loading bay design and TG20-compliant calculations for contractors across London and the UK.
Contact us with confidence:
Info@alpha-scaffolddesign.uk
Cantilever Scaffold Loading Bay guide
General considerations
Installing a cantilever scaffold loading bay requires strict attention to detail to ensure safety, compliance, and structural integrity under heavy loads. By adding a cantilever Loading to an existing access scaffold, will increase significantly the leg load to ground.
Follow this step-by-step guide to correctly assess and install a cantilever loading bay, avoid common errors, and ensure a safe build from the ground up.
1: Foundation and Bay Sizing
The stability of any scaffold structure begins at ground level. Because loading bays are subjected to exceptionally high loads, standard base setups are often insufficient.
- Foundation: A pyramidal sole board arrangement is highly recommended to properly distribute the massive weight and high loads transferred through the standards. Alternatively, Double standards with increased spreading are added.
- Bay Dimensions: For optimal structural integrity, keep your bay sizes compact. Inspect the design and follow the bay sizes shown depending on the loading.
2: Bracing in the scaffold Lifts
Once your foundation is set and the kicker lift is complete, bracing is required to prevent any lateral movement or twisting.
- Ledger Bracing: Ledger braces must be installed in every single bay under the cantilever beams without exception.
- Sway / Facade Bracing: Sway braces (or facade braces) should also be installed all the way to the cantilever Loading Bay.
3: Scaffold Ties
A frequent error that causes cantilever scaffold loading bays to fail by toppling over is when the scaffold ties are missing. It is very important tat ties to be installed into the wall or slab at the back if the cantilever Loading Bay.
- Check the Ties: Sometimes Shear ties are required.
See also Progressive Loading Bay
Cantilever Loading Bay Installation
As the main scaffold is strengthened you can progress to beams installation.
A: Beam Selection
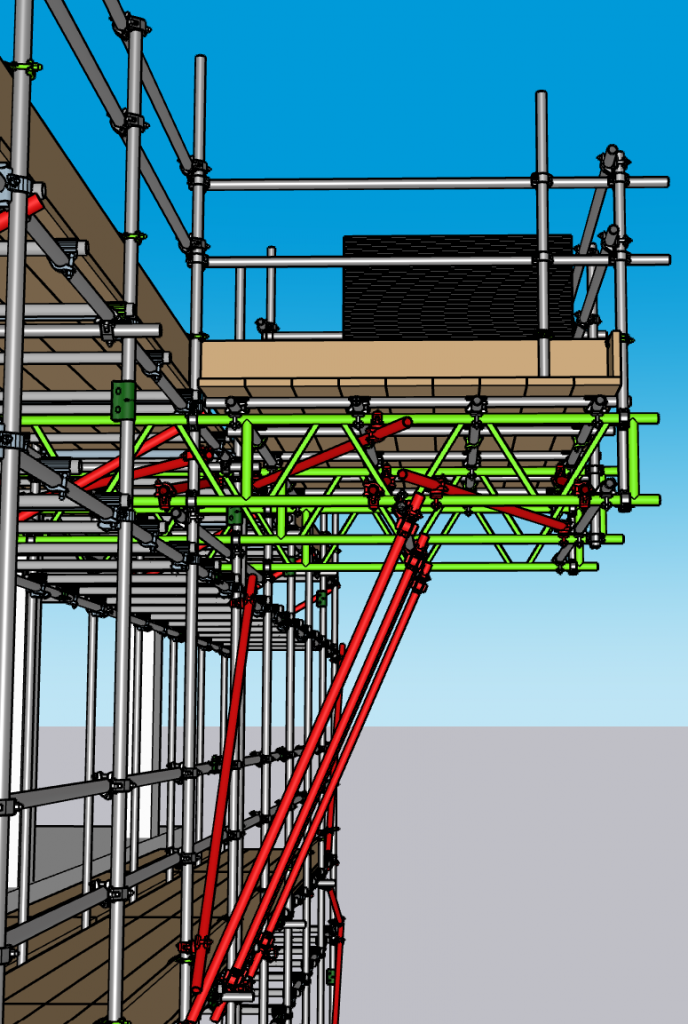
- Beam selection shall follow the approved scaffold design and calculations. Depending on cantilever length, live loading and structural arrangement, ladder beams, 450 mm aluminium beams or 750 mm aluminium beams may be specified. Beam substitution should never be carried out without engineering approval.
B: Lacing
- Lacing spacing depends on beam spacing, loading and structural arrangement. Whilst approximately 600 mm centres may suit many applications, the spacing shown on the design drawing shall always be followed. Lacing should be connected using double couplers or Band and Plate connectors where specified.
C: Beam Restraint
- Beam restraint is critical to control lateral torsional buckling and excessive movement. Restraints are commonly installed at 1 m or 2 m centres. Plan braces may connect to beam chords using swivel or double couplers. Section braces may be fixed with double couplers or swivel couplers where Band and Plates are used.
D: Spur Standards (Spur-Ups)
- Spur standards may be installed from the ledger on the lift below to the underside of the cantilevered beams. They provide an additional load path, helping redistribute vertical reactions, reduce peak reactions in the front standards and improve the structural behaviour of the supporting scaffold. Their number and location shall follow the approved design.
E: Supplementary Couplers
- Supplementary couplers increase joint capacity and improve resistance to ledger slip where significant reactions are transferred into the scaffold.
- Double standards are only required where dictated by the design, depending on scaffold height, loading bay position and resultant vertical reactions.
F. Double Standards
- Double standards are only required where dictated by the design, depending on scaffold height, loading bay position and resultant vertical reactions.
Other aspects:
- Cantilever beams should be supported by both outside and inside standards. Where existing bays are too wide, additional standards may be required.
- The engineer should verify that the self-weight of the supporting scaffold is sufficient to resist uplift. Where required, inside standards may need splicing or other measures identified by structural calculations.
Please note: This is a training/illustration example.
Professional Cantilever Scaffold Loading Bay Design Services
While mastering the correct scaffold cantilever loading bay installation is crucial for your site teams, ensuring the structure is legally compliant requires expert engineering. At Alpha Scaffold Design, we provide comprehensive cantilever scaffold loading bay design services tailored to the exact requirements of your construction site.
Because cantilever loading bays may be required to support heavy materials such as bricks, blocks, and site equipment, our specialist engineers calculate precise Safe Working Loads (SWL) to guarantee structural integrity under pressure. We manage the complete scaffold design process from start to finish.
When you partner with us, you receive:
Fast & Reliable Turnarounds: We know delays cost money, which is why we deliver high-quality, practical designs that work seamlessly on-site.
Fully Compliant Engineering: We ensure every structure meets strict UK safety regulations, TG20 guidelines, and local site standards.
Clear easy-to-read designs: We provide crystal-clear CAD drawings using specific scaffolding terminology so your scaffolders know exactly what to build, eliminating guesswork.
For enquiries: Info@alpha-scaffolddesign.uk or WhatsApp: 07896979966
Below you can watch a quick YouTube reel
❓ Scaffold Progressive Loading Bay – FAQ
Q1: Why are loading bays more prone to failure during inspections?
Because of improper transom arrangements, missing check tubes, and inadequate foundations. These elements are critical for handling high loads safely.
Q2: What is the recommended bay size for a loading bay?
Compact bays perform best. A 1.0m x 1.0m bay is ideal, while 1.2m width may be used depending on design and loading requirements.
Q3: Why are double transoms required?
Double transoms provide proper load distribution and reduce stress on ledgers. Single transoms are a common cause of failure under heavy loading.
Q4: Are Supplementary couplers really necessary?
Yes — they are essential. Missing Supplementary couplers is one of the most frequent inspection failures. They improve load transfer and prevent movement.
Q5: How much bracing is required in a cantilever loading bay?
Loading bays require the beams to be fully braced:
- Ledger bracing in all bays
- Sway/façade bracing from the ground
Q6: What is the purpose of double Spur-ups?
Spur-ups, transfer the load to Standards and shares the load over multiple Couplers.
Q7: Can a cantilever loading bay be built using standard scaffold practices?
Not always. Cantilever Loading bays carry significantly higher loads and require enhanced foundations, tighter bay sizes, and additional components compared to standard scaffolds.
Q8: Is this guide a substitute for scaffold design?
No. This is a training/illustration example. Final arrangements must follow the project design brief, temporary works controls and the issued scaffold design.